May 30, 2011

T-ball Party

The weatherman was predicting a chance of rain, but luckily, as most weatherman predictions go...
he was wrong!
Saturday we had glorious sunny weather, and got to enjoy a great end of the season party with the Paw Socks t-ball team.

{Husband - coach,  six year old son - one of the players.}


The party was held in our backyard.
The little t-ballers and their families were greeted into the backyard with this homemade sign and balloons in the team's colors.

The sign was super simple to make.
I printed "Welcome Paw Sox" in giant letters onto card stock, cut the letters out individually {by hand}, and strung them together with twine.


Two long tables were set up for all the food.
I draped them in two blue dollar store plastic table cloths.

Since it was Memorial Day weekend, we hung our American flag over the deck.
{Which made a great backdrop!}

In the center of the serving table I placed a large glass container and filled it with baseballs.
The silverware was all placed in popcorn containers {also found at the dollar store}, which also seemed summer-y and baseball-y to me.
{Just a portion of the tables and chairs set up for the afternoon.}
We had a really great turn out!


We set up several activities in the backyard to keep all the boys and their siblings entertained while the parents chit chatted.

One of them was this pitching stand that my husband made out of some left over plywood and chicken wire he found in our garage.

{The bucket of balls just waiting to be thrown into the pitching stand.}

We had some great American fun this weekend.

How about you?
Did you have any fun plans this Memorial Day weekend?
Do tell.
.
.
.
P.S. - I'm so grateful for our country and for all those who have and who continue to fight for it's freedoms.

May 27, 2011

Connect


I've been busy all week getting our house + yard semi spruced up for an end of the season t-ball pizza party at our house this Saturday.
My husband had the fun opportunity of coaching my sons team
THE PAW SOX.
Awesome kids.

Sooooo...
I'm super late in helping to spread the word to any locals about CONNECT.

Some amazing bloggers, Danyelle, Lyndsay, and Randi  put together that awesome flier up there and are hoping to meet and talk "shop" at Starbucks with any local bloggers in the tri-cities Washington area.

I've already got a sitter lined up for that night and I can't wait to meet up with this lovely group of bloggers while sipping on a hot sweet cup of hot chocolate.

Are you local? 
Wanna come?
Check out the flier for details.

Can't wait!

May 26, 2011

One Year of Blogging


One year ago today, I published my first post on this blog.

When I first started this blog I had no idea what it was going to be like.

I just felt like I should do it.

It hasn't always been easy but it. is. so. much. fun!

To all of you out there who have ever read my blog,
thank you.
Thank you for your kind comments.
Thank you for your friendship.
Thank you for your time.

I've only ever done one or two giveaways on this blog before,
 but I thought this day deserved to be celebrated with another one.

Here's what I'm giving away to one lovely reader as a thank you:
{Wish I could give something to you all!}


I've included a few of my favorite things:
hard red wheat for growing your own wheat grass
{instructions will be included}
a package of blank thank you notes
a handmade flower pin {made by me}
a $10.00 gift card to Tarjay
{love, love, love shopping at Target!}

All you have to do to enter this giveaway is leave me a comment letting me know if you are a follower of this blog, subscribe to this blog, or you are a frequent reader.
You don't have to have your own blog to enter.
{Just click on "comments" at the bottom of this post.
Under "comment as", just click anonymous and leave me your name so I know who you are and can contact you somehow if you're the winner.}

Giveaway closes one week from today, Thursday, June 2nd.
Winner will be chosen by random.org.

Thank you all for a wonderful year!
~Robin

May 25, 2011

Sweet Ribbon Barrettes - How To


I hope every one's having a good week!

Recently I made some ribbon barrettes for my two girls.
They're so easy + inexpensive to make that I just had to share them with you.


First off, if you need some cute ribbon, go check out Target's dollar spot.
For a buck you can pick up ribbon like this.
Each color of ribbon is only long enough to make two of these barrettes.
{But the entire thing would allow you to make up to 12 barrettes.}


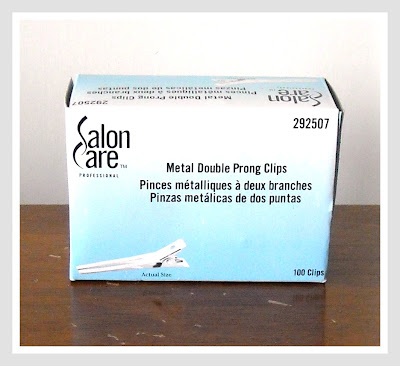
You'll also need some hair clips.
I buy these kind of clips at Sally's hair supply store.
This box comes with 100 clips and costs just a little over five dollars.
Great deal!


Just take a clip and simply hot glue some ribbon around it.
I like to start from the inside and then wrap it all the way around and back inside again on the other side.
Make sense???


Here's the finished product.
Simple, right?


Now you can leave your clip just like that or you can go further
and add a little embellishment to it.

Cut another piece of ribbon about two and a half times as long as the clip.
You can choose the same color of ribbon that you wrapped the clip up with or you can get a little crazy like me and pick some ribbon with a different pattern for the embellishment.


Fold the ribbon over twice so it looks something like the picture above and add a couple small dobs of glue in there to make it stay.
Then glue the whole thing onto the center of the clip.

Cut another piece of ribbon about half the length of the clip.
Again, it can be the same ribbon the barrette was originally wrapped in or you can choose a contrasting pattern like I did.

Pinch the barrette open and wrap the small piece of ribbon around the center of the clip.

Love it.


These barrettes are so cute on little girls.
They would also make a sweet little gift for a baby shower or for a little girl's birthday.

On another note...
can you see I had a little helper this morning as I was taking pictures for this post?
Trying to be like mom. What a cutie!

May 18, 2011

Spring Into Summer Mantle


Just a little under four weeks from now, my kiddos will be out of school for summer break.
I'm sooo looking forward to this.
I can't wait to enjoy my kids without being on a super strict schedule.
And I will NOT miss having to make three trips to their school every day for drop offs and pick ups.

So because summer is quickly approaching, I decided to make a few little decorating changes to my fireplace mantle to help ring in the new season.

I didn't make a lot of changes when it came to switching from a spring decorated mantle
{like from this post} 
to a summer decorated mantle.
Just tiny tweaks.
.
.
.
I kept the green wheat grass in the one dollar target pails, because bright green grass and pails totally remind me of summer.


...but I did switch out the existing spring hurricanes with 
my new thrift-ed hurricanes from Goodwill.
I filled each hurricane with a star fish {Micheal's $4.00 ea.}
and made some 'rope' to go under each star fish by braiding together about six long pieces of twine.
{I'm luv'n these small little summery changes!}


And I just have to say, that although my mantle is ready for summer, my kiddos are ready for summer, and I'm ready for summer...the weather around here apparently hasn't quite gotten our memo.
It still feels like march weather around these parts.

Oh-well, I'm sure it will warm up in no time!
Have a great week!
~Robin

Linked here:  The Lettered Cottage

May 17, 2011

Household Cleaning Schedule - Free Printable

Back in September I shared with you my household cleaning schedule.
Now to be honest, I don't always stick to this schedule.
Some days life is just too hectic.  
But it's still nice to have this check list around for days when I do have more time for cleaning.

Because I've had quite a few requests for a copy of this cleaning schedule,
I decided to offer, for those who are interested, a free printable copy of it.
I included my original household cleaning schedule 
and...
a blank schedule that you can print and write in your own household chores.
{I know each home's needs are different and sometimes they even change throughout the year.}

You can click on the link right under each cleaning schedule to print off your own copy.

Happy Cleaning!


{click HERE for copy}


{click HERE for copy}

May 16, 2011

Free Glidden Paint


Just thought I'd share...
Today and tomorrow you can go sign up for a free quart of Glidden paint.
After you sign up, the paint will arrive in 8-10 weeks.
{kind of awhile to wait}
BUT, whether you have a small little painting project you'd like to tackle sometime this summer or you just want to try out some of their paint, this is a great deal.

{Thanks for the tip Money Saving Mom!}

Budget-Friendly Inspiration

Hey everyone!
Hope you had a great weekend!
Mine was filled with t-ball games, hanging out with good friends, cleaning my house, going to church, and spending lots of time with my family.
AND we got a HUGE downpour of rain Saturday night.
{The kiddos thought it was the coolest thing ever!}
Anyway, I'm back again with some amazing budget-friendly inspiring projects
that I wanted to share with you.

I've put several of these on my
ever-so-long-but-someday-when-i-get-around-to-it-i-totally-want-to-try-this
list.
{Anyone else have a list like that???}

Click on the link below each picture if you want to find out more about each project.


This. Is. Amazing.
This art piece was made using toilet paper rolls!!!
Genius!


Wouldn't it be sooo fun to throw a candy land party and make these giant lollipops!
You could easily make these using large balloons, clear wrapping paper and cheap PVC pipe!
So fun!!!


Sunburst mirror.
Amanda got this look using those FREE paint sticks you can get where ever you buy your paint.
This just proves that lovely wall art does NOT have to be expensive to be beautiful.
Love this idea.


I'm in love with the idea of displaying children's books so they can actually see what books they have instead of just seeing the spine of each book they have.
Chris gives a great tutorial on these little book shelves.
They would be so cheap + inexpensive to make.
I'm putting this project at the top of my someday-I-want-to-make-this list.


This was a shirt bought on clearance for $1.00
Then she used another shirt to add some style to it.
So cute!!!!


Having a picnic or a pool party this summer?
Go to the link below the picture and you can print off these water bottle labels for FREE!

Well, that's all for now!
Have a great week you guys!


May 5, 2011

Embellished Thumbtacks - A Tutorial


Thumbtacks are useful.
But embellished flower thumbtacks are fun and useful.
What's even better is that this would be a super easy, (last minute) Mother's Day gift.


{Here's what you need}
Some sort of polyester or silky satin material,
scissors, glue gun, hot glue sticks, thumbtacks, pearl beads, candle
*optional: cardboard, mod podge, sponge brush, scrapbook paper

{I know a lot of you may already know how to make these kind of flowers,
but if not, here are some basic directions.}

Step One :: Cut out 6 uneven circles about 1.5 inches in diameter
cut 6 {medium} uneven circles slightly smaller than the first
cut 6 {small} circles slightly smaller than the second one


Step Two :: Hold each circle close to the candle flame.
The edges of the material will crinkle up.
But these circles are small so watch your fingers and be careful!!!

{All three circle sizes ready to go, with crinkled edges.}


Step Three :: Hot glue all three layers of circles together with a small dob of hot glue between each layer.
{Not Pictured} Hot glue a pearl bead in the center of the layered flower.


Step Four :: Hot glue the flower to a thumbtack.
{...please pardon my very dry hands.}

Pretty Finished Product.


Optional Step :: Cut out two rectangle pieces of cardboard,
hot glue them together,
 then use mod podge to adhere a piece of scrapbook paper
on top of the cardboard layers.


Optional Step Two :: after the mod podge on the scrapbook paper has dried,
stick all six thumbtacks into the cardboard.


 I love how these embellished thumbtacks pop on this cork board!

Happy Mother's Day to all you women out there!
Whether you have children or not, we are all nurturers to someone.
Have a great weekend!


Linked to: The Shabby Nest, Tatertots and Jello


May 2, 2011

Out With The Gold In With The New


We inherited some lovely gold appliances when we bought our home almost two years ago.
We decided not to replace any of the appliances until they kicked the bucket.
{And boy did they use to make things last 30+ years ago!}
But finally last month the dishwasher had finally had enough and stopped working.
So we got a new white dishwasher to match our white painted cabinets.

We didn't get anything top of the line, just a basic model.
We plan on adding an addition to our home in 4-5 years.
Part of this addition will include expanding our kitchen.
So most of what we're doing in here is just a temporary fix.

This is a picture of the kitchen the day we signed the papers on the house.
Can you see that foe brick already being demoed on the floor there?
My husband was more than anxious to get his hands on this house and fix it up.
{I love this man of mine who loves to demo and fix things up!!!}

{Current Kitchen}

One gold appliance gone.
One to go.
{wink.}

The sort of funny {but not really for my husband the handyman} part about replacing this dishwasher was that as soon as my husband replaced it,
the water valve under the sink broke.
{Had to take a trip to Home Depot.}
He came home with the wrong fitting part.
{One more trip to Home Depot.}
Valve. Fixed.
Kitchen faucet starts leaking...
Find out it's broken too.
{Another trip to Home Depot.}
So what does a broken dishwasher,
ordering a new dishwasher,
having the new dishwasher arrive five days later,
and three trips to Home Depot equal???
A new dishwasher. A new water valve thingy.
AND
a new kitchen faucet.
Having a working kitchen...priceless.

If you read this hon, thanks for all your hard work!!!

Related Posts Plugin for WordPress, Blogger...