Showing posts with label Crafts. Show all posts

Jun 6, 2013

Woodsy Magnets Tutorial


My youngest is five, heading to kindergarten in the fall.  So we're kind of getting past the whole alphabet-magnets-on-the-fridge stage of life.   But before I up and get rid of the alphabet magnets, I needed to replace them with something else.  I"ve seen wooden magnets here and there on the internet.  I love the simple, natural look of them, so I decided to make some for myself.  If you want to make some too, here's an incredibly easy tutorial, that literally involves like two steps...


Step one:  Saw a branch of wood (branch or log should be approx. 1-2 inches in diameter ...mine are 1.5 inches), at a thickness of about 1/4 of an inch.  Repeat this step in order to make as many of these magnets as you'd like.  

(P.S. ...I had my husband do the sawing for me.  I used cherry wood and because it's a hard wood, you have to hold it really tight and saw slowly to get it to cut right.)


Step Two:  Attach magnet buttons like THESE to the back of the wooden circles.  They are self adhesive magnets, so there is no gluing or anything involved.

And that's it!  

Super easy and inexpensive, right?

***If you wanted to take these magnets a step further, you could use a thicker branch (maybe 2 - 3 inches in diameter, and paint some chalkboard paint on them.  Then with chalk, you could write things like, "To Do", or "To Buy", or "Good Job!" on them as you hang up to do lists, grocery lists, or a child's latest art project on the fridge.

Feb 18, 2013

How to Make a Homemade Pinata for Under 5 Dollars


A couple of weeks ago my youngest daughter turned 5.  She got to have her first ever friend party.  We celebrated with a candy land theme.  She, of course, wanted a pinata at her party too (what kid doesn't love pinatas???).  She is absolutely in love with horses these days, so a horse pinata was the obvious choice for her.  My original plan was just to buy her a horse pinata.  But I couldn't find a horse pinata that didn't look more like a donkey than a horse.  I'm also cheap.  So I chose to save myself twenty dollars or so and make a pinata for a lot less money than it would cost me to buy one.  

So first keep in mind that none of the pictures in this little tutorial are pretty or cute. I started out this project not planning to blog about it at all, but then changed my mind, thinking that maybe someone else out there might like a little pinata tutorial if they've never attempted a project like this before.

So here we go...

Step one:  Find/Buy a large piece of cardboard.  If you already have cardboard at home, this project will cost you less than five dollars!
I didn't have any cardboard around.  So I purchased a tri-fold piece of cardboard (like what you would use to display a science project) at Target for 1.99.  

Step two:  Trace your desired pinata shape onto the cardboard (make sure you have the room to do this twice because you will need a front and a back).


Step three:  Cut out your drawn out shape.  Then use your shape as a stencil and trace it onto the leftover cardboard.  Cut the second shape out too (this is your front and your back).  You should now have two identical shapes.  (Mine were the horse heads you see in the picture above.) 


Step four:  Cut out 5" wide strips of cardboard to fill in the gaps between the two shapes that were just cut out.  The strips can be as long as you'd like them to be.  If they're too long, you can cut the excess off and if they're too short, you can cut out another strip until you have what you need.


Step five:  Place the 5" strips of cardboard in between the two shapes that were cut out, and, using packing tape or even duct tape, tape the strips to both of the shapes you cut out (in my case, to both of the horse heads).


Here's my horse pinata all taped up.  

Step six:  Before you fill it up with candy or decorate the outside with tissue paper, make two small-ish holes in the top about 3 inches apart.  This is to slide the rope through when you're ready to hang it up for the party. 


Step seven:  Cut through the tape on the bottom of the pinata and fill the inside with candy and/or little toys.  After the pinata is filled up, tape the bottom back up with some strong tape.


Step eight:  Use some of those old skills from elementary school to tissue paper the outside of the pinata.  
(If you haven't done this in a while ...you cut tissue paper, in whatever color you choose, into one inch squares, put a pencil in the middle of a square of tissue paper, pull the tissue paper up around the pencil and dip the bottom of the tissue paper in Elmer's glue.  Then stick the tissue paper onto the pinata and pull the pencil out.   Repeat this step about a thousand more times, haha!)

This step takes a lot of time.  Like probably 6 hours.  If you have some children, ask them to help you with this step.  They'll probably think it's really fun.  Mine loved helping with this step.


I decorated the rest of my pinata with some colorful streamers for the mane and I cut the eye of the horse out of construction paper.  

This actually turned out to be a pretty fun project.  It was really inexpensive to make, but the trade off is that it does take some time to put together.  But if you don't mind spending the time doing it, it's a great money saver.  Personally I like doing simple projects like this while I listen to some mindless tv in the background anyway.  

My five year old loved her first-ever-pinata.  The next day when I asked her what her favorite part of her party was, she said the presents (of course) and the pinata.  She was pretty happy that she got to be involved with making it too.

And now I will end this post by saying that I am really tired of saying the word "pinata," haha.

Sep 6, 2012

Clothes Pin Chip Clips


Have you ever used clothes pins as chip clips?  
They work fabulous and cost just pennies.  A lot less than the "traditional" chip clips you buy in stores.

This week I decided to pretty up these frugal clips by adding some colorful paint to the tips of them.
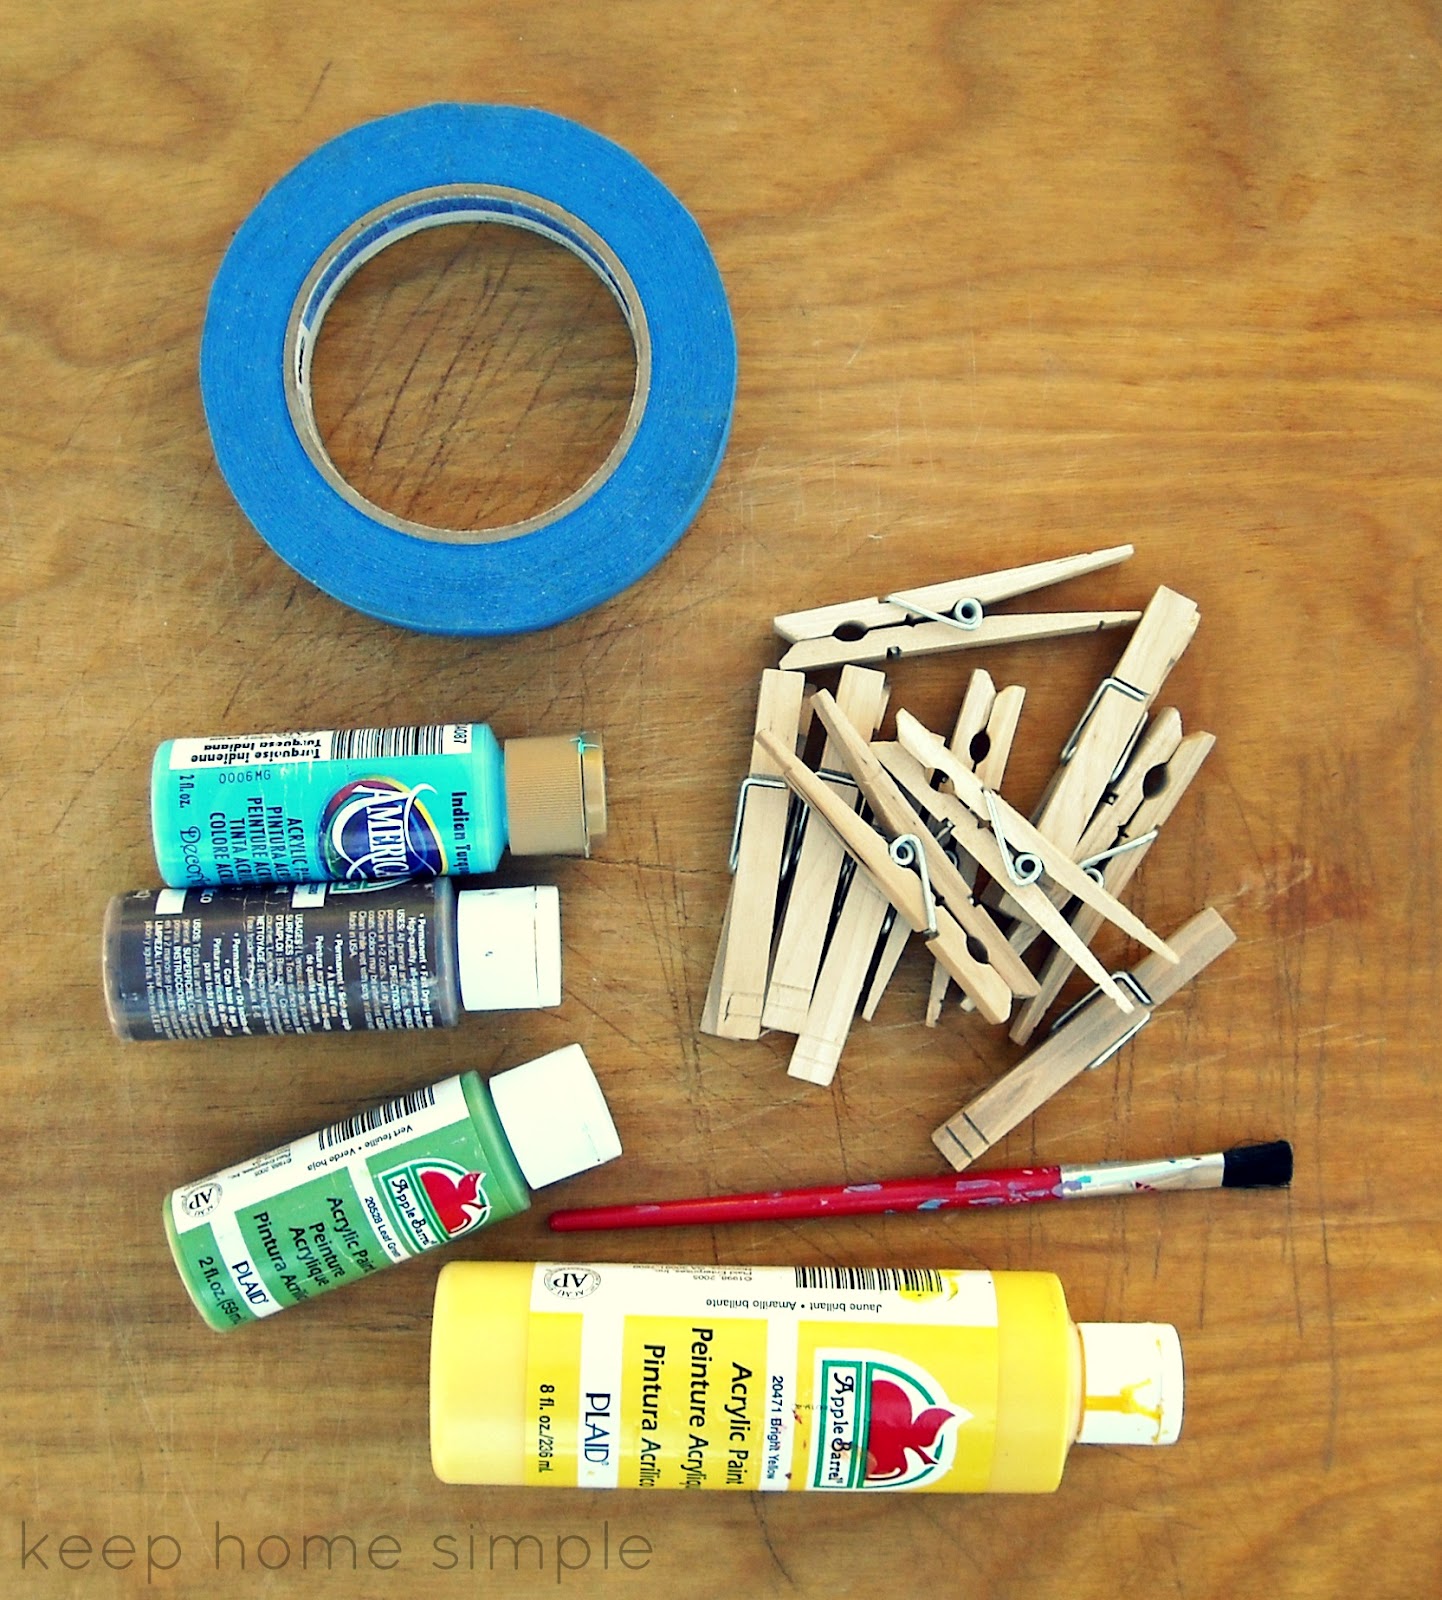
It was so easy.  If you'd like to make some too, here's what you need:

Craft paint + small paint brush + clothes pins + (painters tape - optional).


The directions are very simple.  Pick the paint color(s) you want and tape off right above the top tip of the clothes pin about 1/4 of the way up.  (This step is totally optional.  I ended up just eye balling it. The clothes pins have ridges on them on the front and back and this makes it pretty easy to get a nice clean line.)  Then with a small dry brush, paint the tip of the clothes pin 1/4 of the way up.  One coat of paint all the way around the tip is all you need.  Let the paint on the clothespins dry for about 20 minutes and then you're done and the clothes pins are ready to use! 

Aren't they so cute and simple?


They work like a gem too!

Feb 7, 2012

Recently...

These cold winter evenings have put me in the mood to create.

Creation number 1:  Woven Burlap Pin Board
The inspiration and tutorial for this board came from Emily at Jones Design Company.


It's a fast, simple, and inexpensive project.  {Right up my alley.} 


The two yards of burlap only cost around 4.50.  {Not too shabby.} 
Emily used a thrifted cork board to make her woven pin board.  Because I didn't have an old cork board hanging around the night I put this together, I decided to use something I did have on hand.  Cardboard. 
The cardboard edges didn't get cut perfectly straight, but in real life I promise they are not as skeewompis looking as they appear in these photos.


Creation number 2:  Re purposed Frame

I bought this frame with this "Families are Forever" print in it about five years ago.  At the time red was my favorite color to decorate in.  I still love red. 
But my decorating tastes have changed just a wee bit in the last couple of years and the red no longer matched anything I had around anymore. 


So I switched the print out with a scrap of this fun black and white chevron material.
I added the words "love more" to the bottom right hand corner with some scrap book supplies I had on hand.

I love it and currently have it hanging above my ironing board in my laundry room.
I hate ironing.  But having something lovely to look at while ironing, with an additional reminder to "love more," makes the chore a little more sweet. 


Some other things that have been going on around here recently...


I got a hair cut!
{I'm lov'n the new do but I can't stand that silly smirk on my face in this photo!}


And my youngest turned four.  {I'm still in shock that my baby is, well, not a baby anymore!}

I hope everyone is having a great week and finding some creative ways to stay busy during these last few cold weeks of winter!

Jan 24, 2012

Snow Cream + A Fabric Bulletin Board

I have really enjoyed my short break from blogging.  It's taught me a lot of things:  like to slow down!!!  play more with my kiddos!!!  be my own kind of creative!!!  enjoy the current fleeting moments that will never last!!!  I feel like I'm finally ready to blog again, but I'm going to take it slow.  I'm only going to blog when I feel like it.  I'm not going to put myself on any silly schedule or put undue pressure on myself that is totally not necessary {I don't know why I'm constantly having to tell myself that.  Please tell me I'm not the only one!}  And in the mean time I'm going to live and soak up every moment I can being a young mom and wife.  Life is so great!  It's not perfect {at all!!!}.  But it's still so great!  Lots of things to learn and do everyday.  And speaking of doing things.  Here are a couple of things I've done during my blogging break. 

The first one is Snow Cream.


My mom emailed me this recipe last week.  The timing couldn't have been more perfect either.  We were finally getting snow around these parts, school was cancelled, and we needed some "I'm bored mom!" inspiration.  So you want the recipe too?  Okay, here goes:
1 Cup Milk
1/2 Cup Sugar
1/2 tsp vanilla extract
4-5 Cups of Fresh Snow

Directions:  Bring a bowl outside and scoop up 4-5 cups of fresh, clean snow. Bring it in the house and set it in the freezer until you need it. Mix together milk, vanilla, and sugar, stirring until sugar is dissolved.
Slowly add the snow to your mixture, stirring constantly, until it is as thick as ice cream. Chill in the freezer for 30 minutes and then take it out and enjoy!

We added  oreo's and chocolate syrup to ours. It was sooooo good, I'm not even kidding.
If you double the recipe you'll have enough not just for the kiddos to enjoy, but for the whole family.

The next project I wanted to share with you is this fabric covered bulletin board. 


I've had this bulletin board hanging on my fridge {by several magnets hot glued to the back} for about 6 years.  I put it together while we were still living in Utah.  So it's been a long time.  I really like having it.  It's a fun way to display pictures, cards, etc. from friends and it keeps everything on the fridge looking a little neater.  Plus it's cute!  Anyway, I was getting tired of the black and white fabric it was sporting.


So I decided to change it to this hip and fun gray and white chevron material.  This fat quarter cost me three dollars at a local craft store.  Totally worth the three dollars if you ask me.  And if you noticed, I also switched out the fake lemons in my apothecary jar for green limes.  I don't know, it's just something about the dreariness of winter that was making me miss the color green.  I needed some green in my kitchen to liven up my mood.  And it totally worked.  Those limes make me happy when I look at them.  Silly, I know, but it's true.

Alright, so I'll probably be back later this week with another simple project or two that I did during my blogging break.  {But no promises, because life happens.}
C-ya then friends!

Oct 4, 2011

DIY White Wooden Words

So, have any of you seen these white-canvas-white-wooden-letter art pieces around lately???
I think they are so simple + beautiful.


The amazing thing about them...

They can say anything you want them to say.


This is my own version of white worded art:

Wood, in place of a canvas {only because I already had it laying around in my garage so obviously, it was cheaper to use.}

Wooden Letters { I bought mine at Hobby Lobby.  Each letter came in a package of 4-5 letters and cost 99 cents per package.  **Bonus, these were on sale for 50% off when I bought them.  Score!}

Glue {Elmer's Glue, School Glue, whatever you have around the house.}

White Spray Paint {Walmart $1.00 ...or the more expensive kind, if that's what you prefer.}  

My Total Cost:   $6.50


Simply play with the letters on your board until you figure out how/where you want to place them.  Then glue them in place with your glue.  After the glue has dried, give the entire piece a couple coats of white spray paint. And you're done!  I think this is one of the fastest projects I have ever done and I really like how it turned out.


Like I said before, this type of project could say anything!

Wouldn't it be lovely to turn this kind of project into a wedding present?
Using the bride and groom's first initials you could say, for example:

A + B
established 2011

What a fun addition for a couple's new home together.

The possibilities of what you could come up with combining wood/white canvas + white wooden letters are endless!

Happy Wednesday Everyone!


linked here:  


Sep 6, 2011

Growth Chart

{Pinterest} 

I think growth charts are so charming + sentimental.
Lately I've seen a lot of them around, like the one pictured above, that are wooden and look like giant rulers.
I've been so in love with these kinds of growth charts that I really wanted to make one for my own home. 
One that I could use to measure my own kids growth over the years.
So last week I made one.
I didn't take a lot of pictures to show how I made mine, but it's pretty simple.

The first thing I did was go to my local big box orange store and buy a pre-cut 6' tall piece of pine wood. {Cost:  $16.00  There are other kinds of wood that would work too that would be cheaper, but I liked the look and grain of the pine wood the best.}
Although the look of the natural wood is pretty, I wanted a darker finish, so I stained my board with a walnut stain.
I also wanted my wood to look a little aged.  So to do this I gave it a light sanding and used a hammer to put little dents all over it.  I also used a screw, turned on it's side, and hammered on top of it to give the wood a little bit of a "natural" character too.


{Before I go on, I have to apologize for these next few dark, grainy pictures.  I hung this growth chart in my basement next to our laundry room and that area does not get a ton of natural light.  Sorry!}

The next thing I did was measure every inch on the board with a measuring tape and mark it with a pencil.  With some stencils I bought at Hobby Lobby, I stenciled all the numbers and inch marks with black craft paint.  Because I was going to be hanging it six inches off the ground, I started my stencil measurements at six inches.  After all the stenciling was done and dried, I did a light sanding {by hand} over the numbers, to keep with that aged look.  Then I gave the whole board a couple of coats of lacquer in a matte finish, added a hanging bracket to the back and hung it on the wall.

I love how it turned out.


Right before dinner tonight, I had my kiddos come down stairs so I could  mark how tall they are now, and I added today's date so that I don't forget how old they are at each mark.   I can't wait to see how much they grow over the years!

I can already tell you that, knock on wood, in years to come, if there is ever a fire in our house, this is one of those things, besides my own family of course, that I am going to grab on the way out of the house to go with me.  It will be such a favorite keepsake of mine to someday see how little my children used to be and how much they've grown.  I love saving pictures of my children and little pieces of art that they make, etc.  But seeing how tall they once were at age eight, six, three, or whatever is going to be so cool and tangible too.


linked here:  The Shabby Nest

Aug 26, 2011

Dollar Headbands for Back to School


Yesterday I was at Claire's with my oldest daughter, browsing their earring selection and some of their other cute merchandise.  We saw some really cute headbands with big bows on them that we thought would be perfect to pair with some of her new back to school outfits.  Only instead of buying these headbands I told her I could make her some for a lot less money...

In comes the dollar store.  {by the way this is not a dollar store sponsored post...just so you know :)}Everything you see above, the ribbon, the glue sticks, and the headbands were all purchased at the dollar store.  These headbands are really easy + really inexpensive to make.  All of those materials above cost me about 5 dollars and with my already owned handy dandy glue gun and some scissors, I can make three headbands.  And if I spend one more dollar on a set of three more headbands, I could make six headbands for six dollars.  I think you get the picture.  These headbands are awesomely cheap to make yourself!  If you've never made any like these before, here's how:

{get ready for picture overload...}

Step 1:  Starting at an angle, add a dot of hot glue to secure the ribbon to the headband, and wrap your ribbon around one end of the headband.

Step 2:  Continue wrapping the ribbon, at a slight angle, around the headband.  Stop every now and again to add a dot of glue to the inside of the headband.  This ensures that the ribbon stays securely fasted around the headband and keeps the ribbon from unwinding later. 


Step 3:  Admire your handiwork... even if it doesn't look perfect :)

Step 4:  Cover the ends.  Cut two small sections of ribbon.  One about 3/4 of an inch and one about an inch and a half.  Hot glue the shorter section over the end as shown.  Hot glue the longer section around the end of the headband going right over the shorter section and wrap it in the same direction that you wrapped the ribbon as you were twisting it around the entire headband.  Repeat this step for the other end of the headband too.

For some reason the color in this picture turned out really off.  But never mind that.  This is what the headband looks like when it is completely wrapped in ribbon.

Now on to the bow part of the headband...


Step 1:  Loop your ribbon into a circle {not too big but not too small either}.  Hot glue the top end of the ribbon so the circle stays in place.


Step 2:  Without cutting any ribbon off yet, make another looped circle around your first circle, only this time make it a little larger than the first.  Add a dot of glue to secure the second circle in place and cut off an excess ribbon.  Place the ribbon circles on a flat surface like seen above.  Glue all the center layers of the circles together so that they stay together like in the picture shown above.


Step 3:  Make an accordion fold in the center of the ribbon to form the bow.  Add little dots of glue between the accordion folds {on the front side and on the back side too} so that it stays in place.

Step 4:  I forgot to take a picture of this step, but cut another piece of this same ribbon {about 2 inches long}.  Wrap it around the center of the bow and secure it in place in back with a few dots of hot glue.

Step 5:  Hot glue the bow to the side of the headband with several dots of hot glue and you're done!!!

{Tip:  To make sure I get the bow exactly where I want it on the headband, I usually place the headband on my head, place the bow on the headband, before being glued down, and then when I know where I want the bow to go, I save that spot with my finger, take the headband off my head, and glue the bow down on the spot that I saved with my finger.}

This headband is the perfect addition for any new back to school outfit...
and the perfect accessory for any little girl.

Linked Here:

May 25, 2011

Sweet Ribbon Barrettes - How To


I hope every one's having a good week!

Recently I made some ribbon barrettes for my two girls.
They're so easy + inexpensive to make that I just had to share them with you.


First off, if you need some cute ribbon, go check out Target's dollar spot.
For a buck you can pick up ribbon like this.
Each color of ribbon is only long enough to make two of these barrettes.
{But the entire thing would allow you to make up to 12 barrettes.}


You'll also need some hair clips.
I buy these kind of clips at Sally's hair supply store.
This box comes with 100 clips and costs just a little over five dollars.
Great deal!


Just take a clip and simply hot glue some ribbon around it.
I like to start from the inside and then wrap it all the way around and back inside again on the other side.
Make sense???


Here's the finished product.
Simple, right?


Now you can leave your clip just like that or you can go further
and add a little embellishment to it.

Cut another piece of ribbon about two and a half times as long as the clip.
You can choose the same color of ribbon that you wrapped the clip up with or you can get a little crazy like me and pick some ribbon with a different pattern for the embellishment.


Fold the ribbon over twice so it looks something like the picture above and add a couple small dobs of glue in there to make it stay.
Then glue the whole thing onto the center of the clip.

Cut another piece of ribbon about half the length of the clip.
Again, it can be the same ribbon the barrette was originally wrapped in or you can choose a contrasting pattern like I did.

Pinch the barrette open and wrap the small piece of ribbon around the center of the clip.

Love it.


These barrettes are so cute on little girls.
They would also make a sweet little gift for a baby shower or for a little girl's birthday.

On another note...
can you see I had a little helper this morning as I was taking pictures for this post?
Trying to be like mom. What a cutie!
Related Posts Plugin for WordPress, Blogger...