Showing posts with label Decorating. Show all posts

Jan 17, 2017

Acre House Family Room Update


Most of the rooms in our current home are a little bit bigger than the rooms in our last house.  This is a picture of our family room, taken by the realtors selling this home.  The space is great.  We love the arched doorways and the carpet was brand new. 


This room has a skylight and I love the natural light it lets in.  While there's really nothing wrong with this space, we still wanted to make a few changes to add better flow and a bit of character.  To make this room flow with the rest of the main areas of the house, we painted all of the walls the same color (Dolphin Fin by Behr).  This is the same color paint I used in our split level.  The other thing we did was rip up the carpet (we gave it to some friends because it was still new) and we installed a water proof laminate from Home Depot.  This helped with the flow a lot because the hallway, family room, and dining room had carpet.  The kitchen had an older linoleum, and the living room and entry had a newer linoleum.  Now they all have the same flooring and it makes these areas seem bigger, even though nothing, as far as square footage, has changed.  


Here you can see the newly installed laminate.  In person, it has a lot of texture and a bit of that hand scraped look.  We're pretty happy with it.  However, despite new flooring and a fresh coat of soft grey paint, the room still felt very plain.  That long wall with the tv against it felt too long and open.  So we did what we've done in every home we've ever owned. 
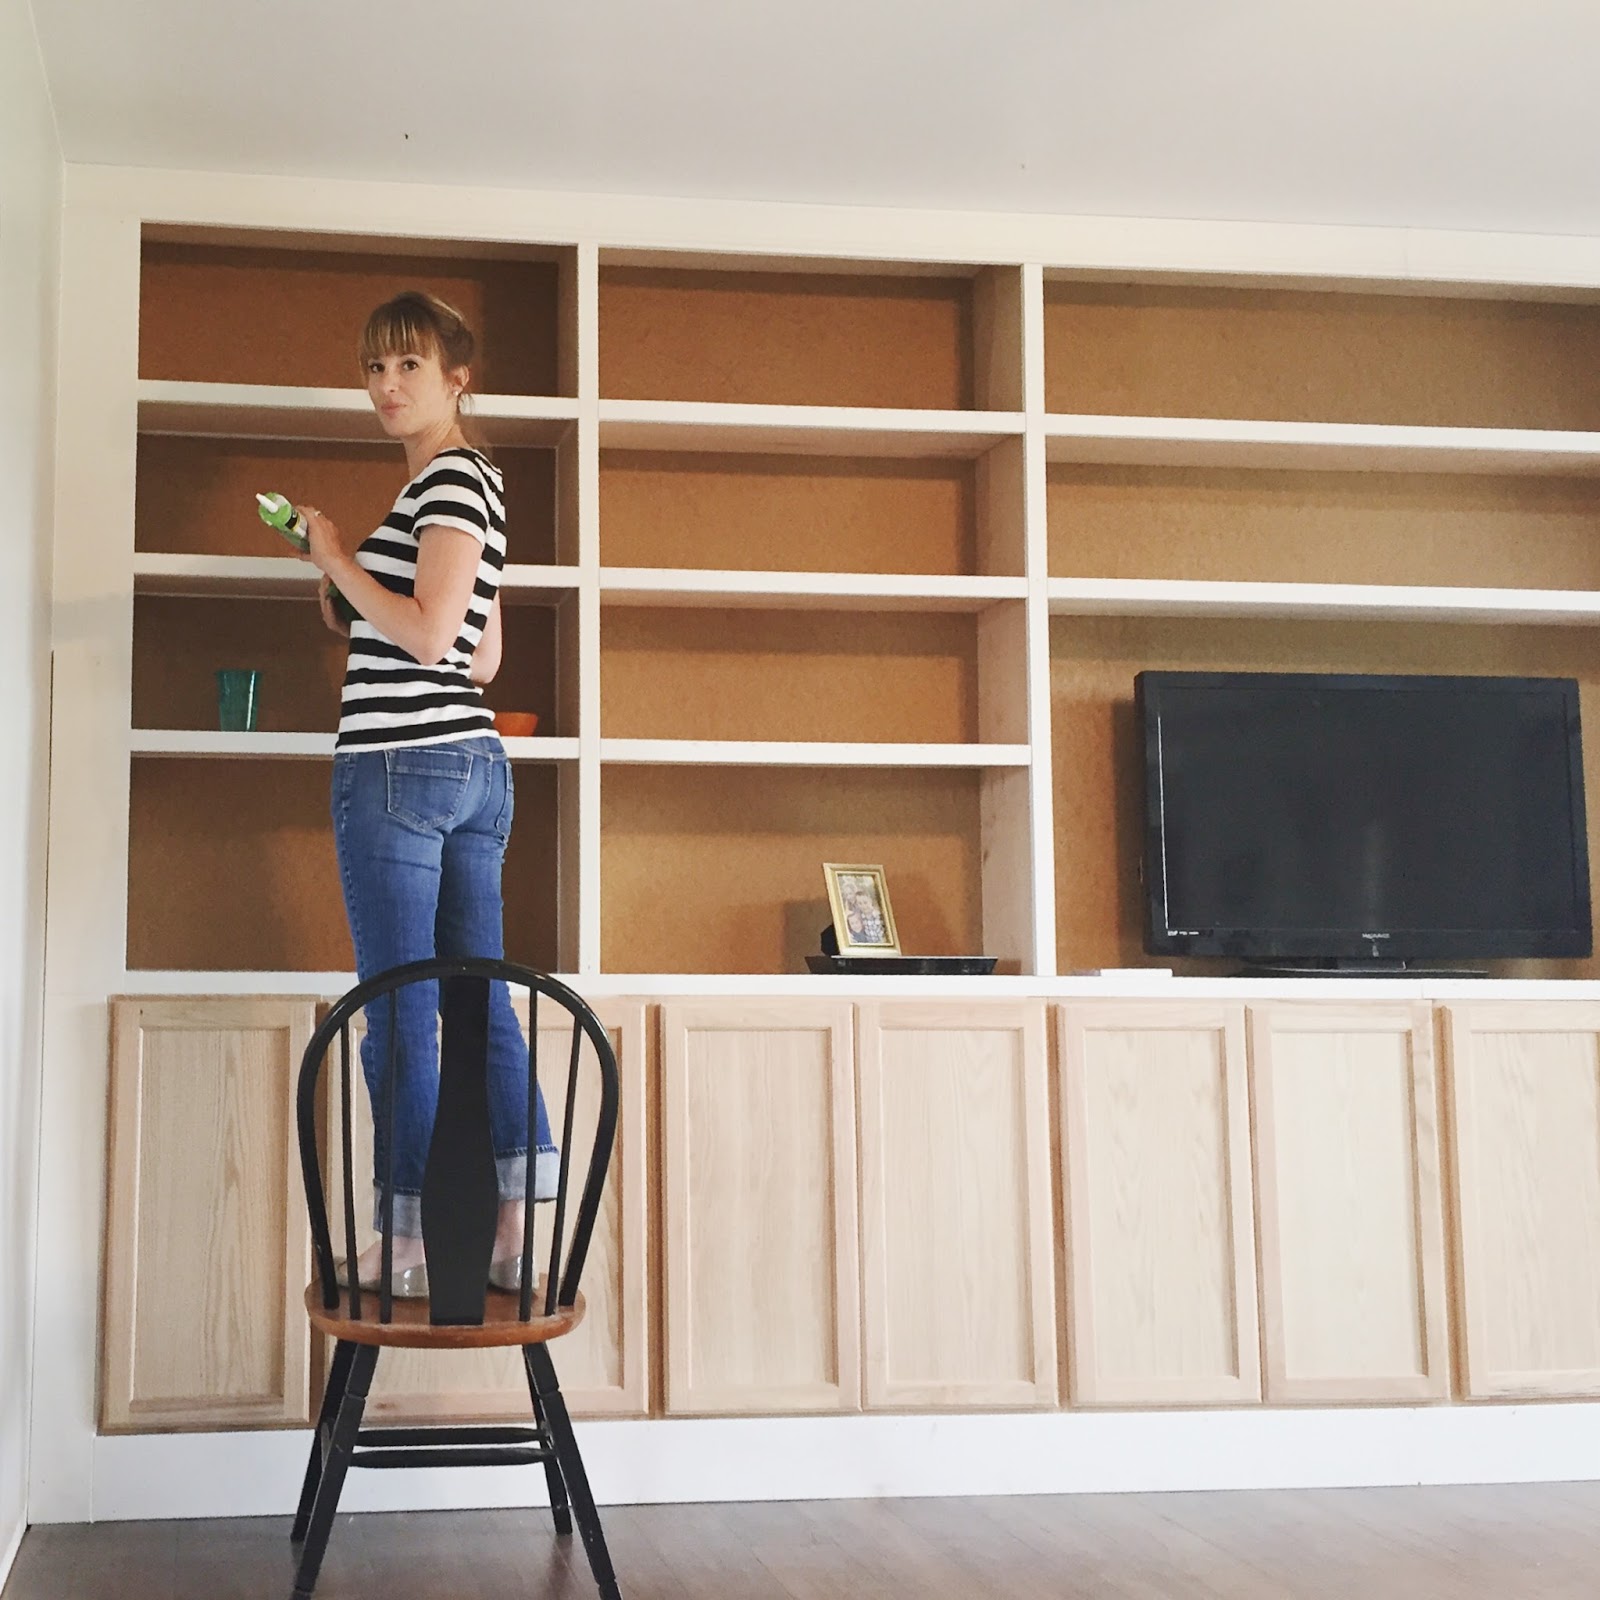
My husband installed built ins.  We did them a little different than we've ever done them before though.  This time, instead of building the lower cabinets by hand (hard and time consuming), we found the idea to use stock upper cabinets.  My husband built a base, about six inches tall.  Then he added some stock upper cabinets from Home Depot to the base. 
Using cabinet grade 3/4 plywood, he built the shelves, with backer-board to give the back of the built-ins a nice smooth surface.  He used small mdf molding to finish each shelf out.  The molding gives the illusion that the shelves are made with thicker wood.  He also used wider 5.5 inch mdf molding to finish out the built-ins around the top and sides.


Every household has their own system.  The system that works in our household is that my husband does the building and I do the finish work.  So here I am calking every seam and nail hole.
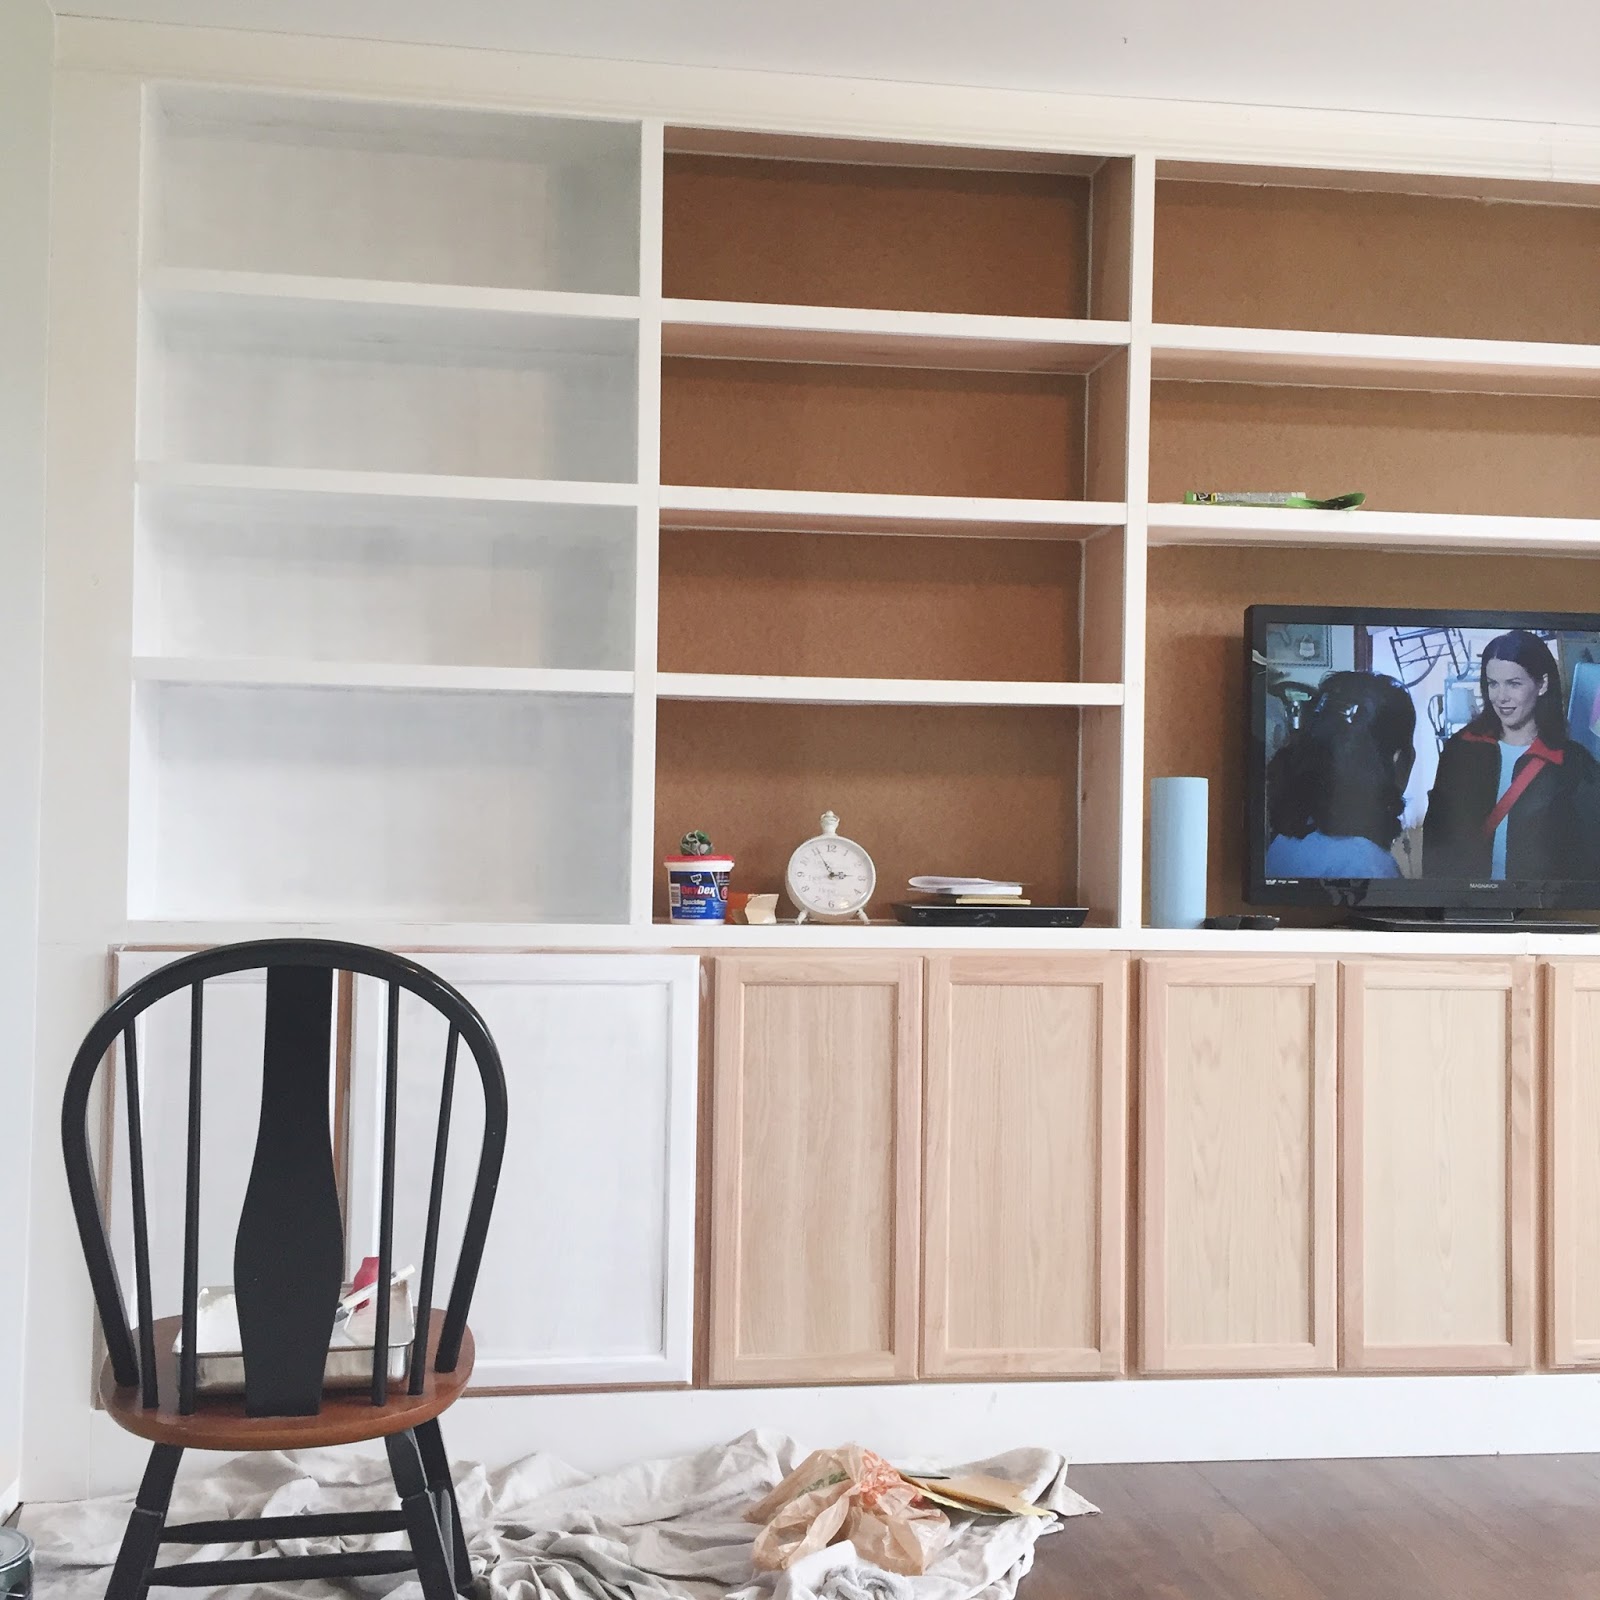

Painting tends to be my job too.  As long as I have something to listen to, on this particular day - Gilmore Girls - it's a pretty relaxing task.


Again, here is a view of how this room looked when we first walked through it.


Here it is today, just peaking through the arched doorway.


This is mOst of the entire wall. It's so long that it's difficult to get the entire length of built-ins in one picture.  But that's a great problem.  These offer so much storage.  As soon as they were completed, I was finally able to unpack the last of the boxes from our move... The games, binders full of family pictures, books, decorative items, DVD's, CD's, etc.  All of that is either displayed on the top shelves, or neatly stored and happily hidden in the bottom cabinets.


This is the wall opposite of the long built-in wall.  Just a cozy corner for watching Netflix, hanging out with friends, or doing homework.


Here, again, is the far wall just to give you a bit of a before perspective of this side of the room.


Here is the after.  This corner is now the "office" space, with old metal file holders, spray painted and screwed to the wall and a desk, sitting nicely below the only window in the room.


The curtains frame this little area and make it feel cozy.


This is the rest of the wall between the window and the door leading to the back deck.


Just another side view of this whole wall.  
You know, It's funny.  (But not funny.)  No part of this room came together seamlessly for me.  Well, except for the flooring and the built-ins...  we had visions of doing those things before we signed on the dotted line to take ownership of this house.  

The hard part was that it was a different layout than the family room in our previous house that I was used to.  I found myself, at first, having no idea where to place furniture or how to decorate.  For the longest time, it didn't even feel like home.  As I just let things be for awhile, slowly our families routine and our needs for this room, shifted pieces of furniture and such to where they are today.  I was silly enough, at first, to think that I needed to get this room just right and perfect, all at once, without letting it just naturally evolve over time.  Too often I put unneeded pressure on myself about these kinds of things.  I wanted the transition of moving to feel seamless for my family and I.  In reality, moving and settling in just takes time.  After living here for seven months, this place finally feels like home. 

Jan 6, 2017

Acre House Entryway Before + After


I really came to love the split level home we fixed up before we moved here.  However, I was never very fond of it's entryway.  It was tiny and felt very awkward when letting visitors in.  One of the many pluses to this rambler is that we can invite people in with room to spare.  While this space may seem very common to some, the openness of this entry feels like a new luxury to me.


The existing flooring was made up of newer carpet and linoleum.   I know it totally looks like wood or laminate in the picture, but it's not.  The variety of flooring this house had, made it feel choppy to us.  So within the first few months, we tore out all of the flooring in the main living areas.  We replaced it with a water proof laminate found at Home Depot.  A couple of the other things we did right away in this area, was new paint (Dolphin Fin by Behr - still a favorite of mine) and we replaced the entry light fixture.


After fresh paint, new flooring, and a new light, my husband installed pine tongue and groove planking just to this one wall here. 


Okay, so this is real life when you're moving in and renovating at the same time.  It's a beautiful mess, but it's real.  I loved how the planking turned out.  So pretty.  I ALMOST considered leaving it raw and unpainted.  But I'm a white and gray decor kind of girl, so the final decision was to paint it white.


 Here we are today.  All moved in and this space now feels more "us".


Here's another glance from a slightly different angle.  Sorry for the blurry picture.  I got a new camera for Christmas and I'm still struggling with how to use it.  Sometimes what looks like a crisp picture to my eye when I'm taking the picture, isn't really so crisp.  I've got some learning to do. :)

I reused these hooks that used to hang in the entry in our old house.  They are the perfect combination of nice to look at and useful.  Lately I've been learning something about myself and decor.  If it can be BOTH pretty and functional, I love it!  Sometimes I have a hard time buying things that are just for looks. Not that I never do, but I like the simplicity of pretty + useful.


I recently purchased this jute rug from Rugs USA.  I love jute rugs for the entry because they can take a beating and this area gets a lot of traffic.  My husband built the bench out of some old wood we had and some industrial metal legs I bought on Amazon.  Another tiny update to this area was some paint on the front door.  I painted it black, but this section of the house doesn't get a lot of natural light.  So I may need to rethink the black and go with something a shade or two lighter.  We'll see.


 Hello!


I tried to be intentional with the things I hung on the walls in here.  We go in and out the front door several times a day.  The first things you see when coming in are a picture of Christ, a picture of the Prophet (Thomas S. Monson - President of The Church of Jesus Christ of Latter-day Saints), and one of our favorite quotes from the Prophet. "May we ever choose the harder right, instead of the easier wrong."
 

I also placed a small clip board in the window sill, next to the front door.  I can clip different scriptures here throughout the year that we are trying to learn or memorize.


The last thing I hung in the entry was this oval mirror.  Just in case we want to glance at ourselves before we head out for the day.  This mirror has some sentimental value.  It used to be bright yellow and hang in my room when I was a baby.  It made it's way into my younger sister's room when I was growing up too and then finally landed in my lap again.

This house has really good bones.  We've only made changes to it that made it feel more like "us" rather than the previous owners.

Next week I'll try to share some updates we made to the family room.  Until then, have a good day and stay warm!  Our winter, so far this year, has been brutally cold!

Sep 3, 2013

Our New Home School Room


I imagined the post I was going to write about this time of year.
It would sound something like, "Well, I just sent my youngest off to kindergarten! 
I now have three hours a day all to myself!  
I'm finally going to have time to tackle all of those projects I've wanted to get to, but haven't had the time for.  Yay!"  
>>>>>>>>>>>>>>>>>>>>>>

Sometimes, I think I know how my life is going to turn out ...what each stage is going to look like.  And then life happens for reals.  SOmetimes it looks the way I imagined it would and other times... times like this, it doesn't.

About mid summer, while enjoying a much needed family vacation, my husband and I started talking home school.  Something we always considered as a possibility mAybe at some point.  But it was a big fat maybe.  Our children's school is a great school.  We have absolutely loved it and often talked about how lucky we were that our children got to attend such a great school.  But the more we talked about home school this time around, the more it sounded like it was what we were supposed to do.  But I needed to be sure.  So I prayed about it.   A lot.  
I felt at peace every time.  
And so..

Instead of sending my three kiddos off to school this fall, I'm going to be homeschooling them.  I am a nervous wreck about this.  I mean, it's my children's education we're talking about.  Pretty important stuff.  But it feels right.  So I'm taking a leap of faith and we're doing this home school thing.

Luckily, our school district has a great homeschool program.  I also have a good support group of friends who have already gone the home school route, people I can lean on when I'm at the point where I want to pull my hair out.  And the bottom line is, right now I know that this year, this is what is best for my children.  In some ways, I'm really excited to be teaching and learning right along side my children.

And the other exciting part???
I got to decorate another space in my home.  Because of course we needed a specific place in our home deticated to home school.  Well, maybe not neeeeded.  But wanted, yes.  And did I need it to be functional and nice to look at?  Yes and yes.  Because I really like looking at nice spaces and if my kiddos and I are going to be spending 1/2 - 3/4 of our day in this area, it needed to be easy on the eyes.  :)


Our school room is located in our newly remodeled basement family room.


I scribbled out this desk idea for my husband.  The next day he bought some plywood and made it for me.  He's awesome like that.

I found three chairs at Goodwill that fit perfectly with this desk. 
I spray painted them all the same color and reupholstered the cushions on a couple of them.
(The chair in the middle still needs a cushion.)


 This table and chair set up is for working one on one with each child as I'm teaching them a new concept.


Sign:  Be Patient and Kind and Forgiving.  
Great classroom and life rules to live by.
And then of course, an American flag that we say the pledge of allegiance to every morning. 


We have been in school for almost a week now.  Overall, it has been great!  But there have been moments that were really hard too ...and I've thought to myself, I can't do this!  I'm just going to put them back into regular public school again! 
But then I get an awful knot in my stomach at the thought of doing that.  Sometimes that seems strange to me because, like I said before, we love our neighborhood school.  
So I guess this is one of those times that I just have to trust in God.  
He knows my children.  
He knows our family.  
He knows what is best for us and why.  
Even when we can't see it ourselves.  
So this is one of those times in life when I just have to move forward with faith.  
I know we'll be blessed for doing so.  :)

May 29, 2013

Front Entry Mini Makeover


Lately, I've been pinning black doors on pinterest.  I loooove how classy and timeless they look and I wanted to copy that same look in my own home somehow.  After browsing through some of these images on pinterest for weeks and weeks, I finally decided to stop looking and just make it happen.  So last weekend, while buying some paint for our back deck, I made a tiny splurge on a small quart of black paint for the inside of our front door.  That's where the black was going to happen.  

Yesterday, I started the painting.  It took three coats of Behr's Satin "black suede" paint to get the job done.  After the first coat was on, I was scared.  It looked like a big black mess.  But after each additional coat of paint, I grew more confident in my decision to paint the inside of our front door.  By coat three, I was in love!  I love how so much white in a home can make everything feel so airy and open.  However, I think having a few dark statements here and there really adds an element of sophistication.


The paint for this project only set me back about twelve dollars.  (Not bad.)  But my financial resources, as far as this front entry way goes, were exhausted after just buying the paint.  While the paint on the door was drying, I put my original IKEA door mat back in front of the door and stood back.  Meh..., I didn't really like the beige and the black together.  Then I remembered that I'd bought a black and white striped little rug about a month ago on clearance at Target.  I had no where to put it when I bought it.  I simply bought it because I was in love with it and it only cost $6.49!  I knew I'd find a place for it someday.  So I brought it home and stuck it in the back of my closet for another day.  And then the day came.  I traded out the rugs and the black and white stripped rug completed the new look ...almost.


The whole time I had been envisioning the inside of my front door black, I also had been envisioning a classy little boxwood wreath hanging on it.  But I didn't have a boxwood wreath hanging around anywhere and I didn't have the forty to fifty dollars to buy one either.  

These times in life when I don't have the financial resources I would like, to do some of the things around my home that I would like to do, often turn into blessings.  They force me to get my creative juices going and I have to think outside of the box.  So I did.  And a great idea came to mind.  We have a random boxwood growing in our backyard.  A sweet neighbor gave it to us.  At the time, we didn't really have an idea of how we wanted to landscape our backyard, so we just stuck the boxwood in a random spot in the ground and it's been growing there ever since.  It's getting pretty big now actually.  So I decided to go in the backyard and trim some little branches off of it.  I brought those branches inside, found a card board box that wasn't being used and cut a wreath like circle out of it, and then I plugged in my glue gun. (Just hoping I could pull all these objects together to make a boxwood wreath.)  I lined up some of the branches in a circular pattern on the table first, to make sure I had enough branches, and then one by one I started gluing and layering the branches onto the cardboard.  And it worked!  It looked like the cute little boxwood wreath that I had been picturing all along.  I hot glued some black ribbon to the back of my homemade wreath and then tacked the ribbon to the top of my newly painted front door.  Then I stood at the top of our stairs and looked down at my completed project - a freshly painted black door, a cute little clearance rug, and a homemade wreath from scraps around my home.  It all came together exactly the way I had hoped it would.  What a blessing.

Apr 30, 2013

Our Split Level Fixer Upper

*Page in Progress
---------------------------


Welcome to our home! 

I post updates on our fixer upper all the time around here, but I thought it was high time that I group all of the before and after pictures of our home's progress in one spot.

So here we go:

Our fixer-upper is a classic nineteen-seventies split level.

We bought it in the summer of 2009 and have been slowly wittling away at fixing it up ever since.

I don't think a single room is completely finished.  But we do have plenty of retro "before" pictures of each room and some pictures of each room as they are "now" to share with you. 

Take a look...
----------------------------------------------------
The Stairway 
Before:


 Now: 

The Living Room
Before:

Now:

Before:

Now:


Before:

Now:


Kitchen/Living Room Wall
Before:


Now:

 The Kitchen 
Before:  


Now:


The Dining Room 
Before:


 Now:

The Upstairs Hall Closet 
Before:


 Now:


Hallway
 Before:


Now:


Main Bathroom
Before:


Now:

Master Bedroom 
Before:


 Now:


Master Bathroom 
Before:


 Now:


Bedroom Number Two 
Before:

Now:


Bedroom Number Three 
Before:


 Now:

 The Basement 
Before:


 Now:


Guest Bedroom
Before:


Now:


Laundry Room
Before:


 Now:


Related Posts Plugin for WordPress, Blogger...